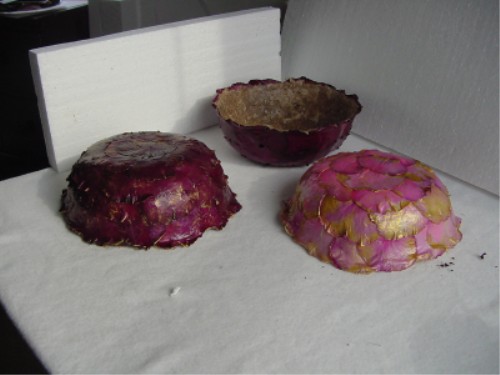

Floral Mache’ Bowls By Linda Ellenwood
These directions are for a bowl, but it works on any stiff surface that glue will dry on. Paper Mache items like boxes or torsos work great.
You will need
3 to 6 roses. Depending on the size of the roses and the size of your
bowl. They can be fresh or frozen. Frozen ones tear a little easier so you
have to be more careful with them. You should thaw them out on a paper towel
for 20 to 30 minutes. You can refreeze any roses you don't use.
Decoupage Finish (will be
called "glue" for the rest of instructions.) The brand I use is "Royal Coat" by
Plaid It's very important the you use a
GLUE THAT DRIES CLEAR!!
A small bowl to put a small amount of "glue" in.
A can or cup or anything you can use to put your bowl upside down on to keep it off the table until it dries. It's also helpful to set the bowl on it to work as you get close to the bottom and the bowl gets gooey.
Wax paper
A gold ink or paint if you want to highlight the petals after your glue dries.
Step 1
Gently pick the flower petals off of 3 roses. Sort the petals out by size.
Be careful and try not to tear them.
Save any petals that are damaged for the bottom of the bowl.
Set the extra roses aside until you need them.
Step 2.
Put wax paper on your work area.
Step
3
Pour a small amount of "glue" in a small bowl.
step 4.
Pick out your best and largest petals (mine took 18 to go around the top it
depends on the size of your bowl.) Dip your fingers in the glue and gently
apply it to the petal.
You want the petal to have enough glue so it doesn't stick to the bowl immediately, but wet enough so you can move it a little to get it in place. If you put too much glue on the petals, they will slide down the bowl as you work..
step5.
Place the top petal at the top rim of the outside of the bowl so that the petal
is just barely above the top of the paper bowl. Gently smooth in place.
We will cover up the bottoms of the petals with the next row.
It's helpful to set the bowl upside down on the cup or can while you work, because it gets tricky to hold as it gets covered with glue and petals.
Step 6.
Dip your fingers in the "glue" again and apply it to another petal. Place it on
the bowl overlapping the first petal. Gently smooth in place.
Repeat step 6 until you complete the first row all the way around the top rim of the bowl. You may have to take some large petals from your extra roses as needed.
step 7
You can start using smaller petals as you go down the bowl.
Apply "Glue" to a petal and place it just below the top row but overlapping it so you cover up the bottoms of the petals in the first row. Try to place the new petal between 2 petals above it like stacking bricks, so your petals have a random staggered look.
Repeat Step 7 until you get to the bottom of the bowl. overlapping your petals and staggering your rows as you go.
You can use any damaged or torn petals on the bottom. Try to smooth these out really well, so it will sit right and won't wobble when it dries.
Refreeze any roses you didn't need.
Set the bowl upside down on the can and let the glue dry. After it dries put another very thin coat of the "glue" over the top of all the petals to protect them and keep them from changing colors.
When the bowl is completely dry sometimes I use my fingers to add a little Brilliance Gold reinker to highlight the petals. Just make sure you use a paint or ink that will dry on the glue.
These are wonderful bowls for potpourri.
Email address cyberartist50@yahoo.com
Copyright
Linda Ellenwood 2006
cyberartist50@yahoo.com
NOTE: ALL RIGHTS RESERVED. NO PART OF THIS PUBLICATION MAY BE REPRODUCED,
STORED IN A RETRIEVAL SYSTEM, OR TRANSMITTED IN ANY FORM BY ANY MEANS
ELECTRONIC, MECHANICAL, PHOTOCOPYING OR OTHERWISE, WITHOUT FIRST OBTAINING
WRITTEN PERMISSION OF THE COPYRIGHT OWNER.